About the App
It’s been updated!

HyperCommute is the app used for the Tconnect on-demand service.
Based on user feedback, we have updated the app and a new version was released on July 31. See the video below for step-by-step instructions on how to use the app.
Using the HyperCommute app,
A step-by-step video tutorial
Getting Started
Download and open the HyperCommute app by Urban Mobility on your smartphone
![]()
Upon launching HyperCommute, you will be prompted to set up a free account.
butStep 1: Book a Ride/Choose your Destination:
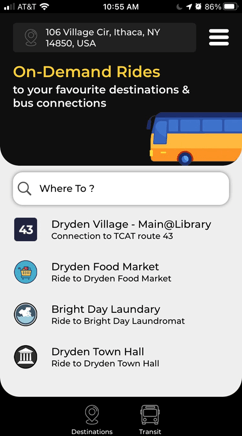 Start from the home screen of the app (As seen on the left). To book a ride on Tconnect, enter your location in the address bar at the top of your screen. Then to input a destination, you have the option of either typing in an address in the “Where To” box in the center of the screen, or you can select a popular destination at the bottom. Popular destinations include connections with other TCAT services such as the route 30 (For the Lansing Tconnect) and the route 43 (For the Dryden Tconnect), as well as popular local destinations such as TC3, and Dryden Town Hall, among others. Alternatively, you can input your destination first, then select where you would like to be picked up.
As a tip, we suggest that you toggle the “Destinations” and “Transit” buttons to filter the list of popular destinations down.
Please note that there are two Tconnect services – the Lansing (Route 77) Tconnect and the Dryden Tconnect. The app will not allow you to ride between the two service areas. Once you type or select your destination, the app will automatically limit your pickup location to anywhere within the chosen service area. To view the various service areas, tap “where to?” to open a map and pinch your screen to zoom out and see the entirety of the service area.
*Tip* Toggle between “destinations” and “transit” buttons to filter the destination list.
Step 2- Choose your Pickup Location
After selecting a destination, the app will ask you to select a pickup location. If you selected a transit connection or destination from the list, you will be able to select a pickup at any address in the service area. The service area is shown in a teal color.
If you entered a specific address as your destination, your pickup location options will be shown in a list – please select an option and hit “continue” or “confirm pickup”.
*Please note* – You can only input a custom address once per trip, as either your destination or pickup address.
Step 3: Select Travel Options & Confirm Booking
On the booking screen, please confirm that the pickup and destination are correct. The earliest travel time is selected, by default, in the middle of the screen. To travel at a later time, please hit the “Later Trips” button and select a time.
You have the option of booking your trip with up to 2 additional people. You can also indicate if someone in your group uses a mobility device.
Once you choose your travel options, hit “Book Now” and HyperCommute will attempt to schedule your trip with Tconnect. You will get a confirmation or a message that the app was unable to book the trip. Please adjust your trip request and try again.
*Tip* Once you have successfully booked a trip, you will be able to see the pickup ETA and map with the location of the bus.